Tuesday, July 31, 2012

Hexagon Easel Card

It's time for a 'trendy' challenge at Pretty Paper Studio
The challenge is pretty simple and exciting.  
To play along:

Surely this will bring out everyone's creativity.


I do however some sad news. This will be my last project for PPS as I will be leaving as a Design Team member. I just want to create for fun for the meantime. It's been a pleasure to know and work with PPS pretty and talented design team members. It's been a journey, short perhaps but one that I will always remember.

Anyway, as for my inspiration in this challenge I have created an Hexagon Easel Card. 
It has bits of triangles in it too.

 Thank You So Much

This is  my first time to make an hexagon  easel card and had so much fun creating it.
I choose the 'Thank You So Much' sentiment from Hero Arts 
as a way to show my appreciation for the time as DT with PPS.
I have pre-order this stamp from PPS earlier this year.

This how the card looks when it is close or folded.

  a close up of the card front...

a close up inside the card...


You may wonder where to write the message.

The center hexagon inside or bottom can be opened 
to reveal a space for writing personal messages.
The butterfly was positioned to hold it close.
 
Supplies:
Cardstock - Kraft, Canson; Paper - Bo Bunny Ambrosia Pad, MME 6x6 Vanity Fair Pad;
Stamp - Hero Arts (Arts of the Card); Inks - Memento Tuxedo Black, Copic BV11; 
Tattered Angels Glimmer Mist Sun Sisters; 
Dies - Spellbinders Foliage, Die-namics Fancy Flourish; Punch - EK Success;
Embellishments - Rose & Fabric Flower (from stash); Brads; Rhinestones

 
I hope I have inspired you with this hexagon easel card.

Cheers,
irene


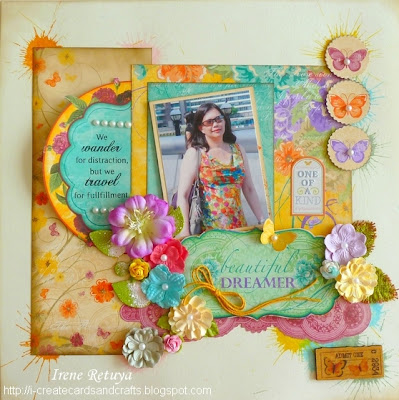
Dreamer

Playing along at Stuck On U Sketches
they have great and inspiring original sketches.

This is their latest sketch.


Here's my layout for this sketch..


Dreamer


The photo was from a trip last year...


I had fun working on the sketch and hope you like it.


Supplies:
Cardstock - Bazzill; Paper - Bo Bunny (Ambrosia Collections) 
Embellishments - Prima Flowers (Mini Roses, Meadow Lark & Petunia Opus) & Fabric Leaves; Prima Wood Ticket; K&Company Edamame embossed sticker; Kaisercraft Rub-ons (Journey); Hemptique (cord); Pearls
Ranger Distress Stain - Spun Sugar, Bundles Sage, Mustard Seed, Wild Honey
Ranger Distress Ink - Walnut Stain; Adirondack Brights Acrylic Paint Dabber - Citrus
Stampendous - Shabby pink embossing enamel

The dream goes on...
Have a great and inspiring day!!!


Hugs,
irene


Monday, July 30, 2012

Happy Birthday to You Card

Hi! Hope everyone is having a FUN-tastic summer.
I came across a blog over the weekend called 'Stuck On U Sketches'. 
They have fabulous challenges going on and have an inaugural card challenge.
So, thought I'd joined in their first ever card sketch challenge. 
Olympics opening ceremony and games 
got along the way in my card making. 
Finally, today I was able to make a birthday card 
for a friend whose birthday is coming up. 

This is the SOUS Card sketch I used.


And here's my card...

Happy Birthday to You

I used Graphic 45 Little Darling Collections - Heaven Sent.


I misted the lace with Tattered Angels Pink Bubblegum Glimmer Mist.


Painted the die cut flourishes with Citrus Adirondack Brights Acrylic Paint 
to brighten a bit and match it with the the flourishes on the pattern paper.


I got the flower from a local shop..added die cut leaves on it.
Stamp my sentiments using Teddy Bo & Co stamp set which is a freebie from
Simply Cards & Papercrafts magazine.


Fussy cut some butterflies and 
added Kaisercraft rhinestones on it.
My card's done.

I hope you like it.


Cheers,
irene


Sunday, July 22, 2012

6x6 Paper Pads Blog Hop

 Welcome and Thank you for joining 
6x6 Paper Pads Blog Hop
 
 If you are following the hop, you would be here from
I love what she have created using the 6x6 paper pads,  
I hope you have checked them out  and do leave her some love.


For this hop, I have a wonderful chance to create using
 I love all the papers in the pad. They are double sided and so pretty.

 
With this designer paper pads, I have come up with a 
Photo Display Stand with 6 double sided display pages.
Not only great for displaying photos but also to display all the pretty paper in the pads.

Dilly Dally Photo Display Stand


The stand is made of chipboard then covered with cardstock
and decorated using the papers in the pad. 
The sides were painted using Jenni Bowlin Cough Syrup Acrylic Paint dabber.

                                         Display stand side A                          and side B

It is like a calendar stand but instead it can display photos.
It can also display months if desired, quotes or maybe just beautiful pages
using 6x6 paper pads. Just like my pages which are exactly 6x6.
Possibilities are endless on what can be displayed.
Here are all the display pages on one side
 
 
and the display pages on the other side

I love how pretty all the pages turned out using the 6x6 paper pads.


I hope you like what I have created.
Get your own 6x6 designer paper pads now and create this photo display stand.
 
 I have used my remaining stuff along with the stamp the comes along from 'Let's be friends?' April Cardmaking Kit, Spring Break Project Kit, Over the Rainbow May Scrapbooking Kit, A Little Something June Cardmaking Kit and Lilacs and More July Scrapbooking Kit. Purchase these kits now and have fun with it.

Other products I used from the shop: Jenni Bowlin Speckled Egg Ink Pad,  Jenni Bowlin Lemon Drops Ink Pad, Tim Holtz Walnut Stain Distress Dye Ink, Glossy accents, Precision Pen, American Crafts Dear Lizzy Mini Pearl Brads and Hero Arts Light Green Accent Pearls.

Supplies from stash: cardstock, lace, roses, blue fabric flowers, white adhesive pearls and rhinestones.

There are lots of 6x6 Designer Paper Pads at Pretty Paper Studio's shop as well as 
other papercraft supplies at a very affordable prices.
Also, avail and enjoy 30% sale that is going on at PPS shop.
Check it out here.

Hop along for a chance to win
 
by leaving comments here and on all blogs on the hop.
Winner will be selected and announce at PPS Blog on 25 July 2012.

Next blog on hop is
Check out her pretty 6x6 project and be sure to leave her some love!

 Here are the links to all blogs on the hop, be sure to visit them all
Irene - me
 

Enjoy hopping and have lots of fun!!! Thank you.


 Cheers,
irene


Saturday, July 21, 2012

Baby Card - Blue Version

Hi everyone. 
Today, I like to share a card I have created sometime back 
but didn't find the time to post it here. 

Here is the card I created with the blue baby pram:

Congratulations

another closer look...
The baby pram in the card is a blue version from the ones on 
 Welcome Little One pink card I had created before. 

Here is a photo of the 3 baby prams before it was added into the cards...


I had fun making those prams a well as this card.
Have a lovely day and thanks for stopping by.

Cheers,
irene 


Tuesday, July 3, 2012

Pretty Paper Studio: Challenge #6 - Recycle it!

It's time for another challenge at Pretty Paper Studio
The challenge is pretty fabulous and pretty simple. 
'RECYCLE IT'

To play along:
  • Just make a project: scrapbook page, card, altered project or any ideas you have in mind that uses a recycle item in it, totally up to you.
  • The project has to be new, means that it is posted after the announcement of this challenge. 
  • Share it in Pretty Paper Studio's Challenge #6: Recycle It! Album in Facebook Group.  
  •  Deadline: July 15, 2012.
  • Of course the winner will receive a prize, a twenty five dirhams gift voucher.

  
Here's my inspiration for this challenge:

 Leeds Castle

I made a 12x12 layout using cardboard as a base. This a cost-effective page with lots of recycled materials. I started by peeling the layer off the cardboard to reveal the corrugation underneath, painted it then did a bit of embossing and a brush of Perfect Pearls. I gather a selection of recycled materials such as yellow pages from an old telephone directory  for my flowers - scroll down for the flower tutorials; pattern paper labels for wordings...


 product packaging for photo mat; assorted paper bags for title, wordings and leaves (cut freely then painted green); dressmaker pins to accent the flowers...

doily as a decorative lace...


thick brochure to die cut my flourishes, for Precious moments wordings (Arabic interpretation included) and punch some butterflies...
 I use some items from my stash such as brads, buttons, hemp and leftover adhesive pearls/rhinestones

Since there was still leftover from the cardboard, I decided to make another project. I created a cardboard photo frame.

Follow Your Heart

 Here's a picture on how I made the frame:

Frame steps

After the paint dried, I did a bit of embossing, brush with Perfect Pearls the same way I did with the layout and also used the same recycled materials.The sides of the frame were coated with gesso.

For the flowers, I pulled out some yellow pages from an old telephone directory. It is tissue thin and easy to crunch up.This is how the flowers were made:

1. Hand cut or die cut scallop circles or just plain circles using the yellow pages. I used 7 scallop circles. When using pattern papers, spray it with water or mist it so it will not tear off.
2. Punch a hole at the center and attached a brad.
3. Crunch up layer by layer then all layers together around the brad.
4. Distress the flower petals as desired then arrange. It is now ready to use as embellishment to your projects.
I hope you find my recycle project inspiring.
Create yours now and play along with us.

For more inspiration on this challenge, 
visit other PPS design team's blogs 
 Donna & Shruti 
and see how they made their awesome projects. 
Don't forget to leave them some love.
Hugs, 
Irene 


Sunday, July 1, 2012

Pretty Paper Studio: Lilacs and More July Kits Revealed

Hi everyone! 
It's the first day of the month and time to welcome Pretty Paper Studio's 


To purchase these kits please visit www.prettypaperstudiouae.com or 
place an order via email: ppsuae@gmail.com


It is Lilacs and More Scrapbooking Kit for me this time and here's what I created...
 
Precious Journey

This layout is based from the sketch that comes along with the kit...

 
PPS July 2012 Sketch

And more layouts from the kit...
One Fine Day

I Want to Play More

Dare to Dream 


Time for summer fun... 
So what are you waiting for,
Head over to Pretty Paper Studio's online shop, here.

You can also find PPS and like at FB, follow on twitter, 
view on You Tube and Pinterest.


I hope you'll have a 'pretty' inspiring day and a crafty good time.
Thanks for dropping by.
Cheers,
irene