My first card is a Christmas Box Card.
JOY
This
is the side view of the card. I have decorated the spine with ruffled
lace which I have misted with Bronze Tattered Angels Glimmer mist and a
strip of red velvet ribbon. Embellished the front side with cut out
design and sentiment from the same paper collection.
I had as much fun decorating the box inside the card and this is how it looks inside. The beauty of this card does not only shows from outside but also from inside. For those who do not celebrate Christmas, the theme of this card can easily be changed for any occasions.
My second card is quite simple, quick and easy to make.
Merry Christmas
Created a tent-fold style card. After layering the front with cardstock, pattern papers, trims and die cut swirls, I used layered stickers dimensional from the same MME All is Bright collection. Finished it off with some adhesive pearls at the corners.
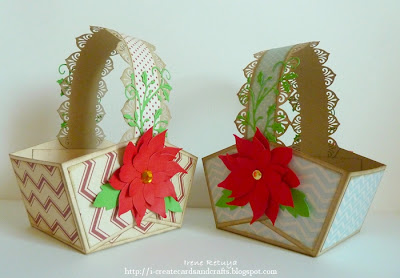
The last project I made are the Christmas Gift Baskets and this how the baskets look like.
Here is a tutorial for the Christmas gift basket.
Supplies: Cardstock, Pattern Papers,
Trimmer/scissors,border punch, adhesives, embellishments of your choice; Optional: Distress
ink, manual die-cutting machine & dies.
1. Cut cardstock to 8 ½
inches square and score at 2 ½ inches on all sides. Cut as indicated using the template below as guide.
2. Using pattern paper of your choice cut panels and adhere the panels to the basket shape as shown. My panels measures as follows: 2 ¼ inches square for corner panels, 2 ¼ x 3 ¼ inches for center-side panels and 3 ¼ x 3 ¼ inches for the center panel or bottom of the basket. Distress score/cut lines and edges as desired.
3. Assemble the basket. (Opps..I took the photo before I have attached the pattern papers)
4. Cut a strip of cardstock to 2 ½ x 11 inches and punch both edges. Top with a strip of 1 x 11 inches pattern paper and adhere to the basket to act as a handle.
5. Decorate basket as desired.
I hope I have inspired you all today.
Drop by at Paper Lane...grab the All is Bright paper collection from My Mind's Eye. You'll also be amazed by all the goodies available in the store. Also check out the design inspirations from my fellow DT.
Wish you all a Merry and Bright Christmas.
Until next time, happy crafting!
Cheers,
Irene


Wow! Georgeous work...love all your cards and the basket, inside of the box card is stunning... glad to follow you and thanks for the basket tutorial :)
ReplyDeleteSorry for the late reply, been out of the blog for quite awhile now. Really appreciates your visit and thanks a lot for following:)
ReplyDelete