Hello crafters.
I hope everyone is having a crafty
time. I'm trying to get things organized, paint it up, inspire myself and get
creativity flowing. One of the best way to do it is by having a clipboard!
Clipboards are inexpensive yet when painted it can dress up your walls beautifully and organized your life.
I have painted the middle part of a clipboard using Martha Stewart multi-surface gray Chalkboard acrylic paint as my easily erasable writing surface. I applied 4 coats of chalkboard paint.
I painted the bottom part of the clipboard which is around 2inches using Martha Stewart multi-surface Glow-In-Dark acrylic paint. I die cut letters using Tim Holtz alterations vintage market alphabet die as masks for the word 'remember'. Both paints has a creamy, smooth texture and really good consistency.
Again, I die cut letters from cardstock using Tim Holtz alterations vintage market alphabet die for 2013 and 'inspire' words which I also painted with Glow-In-Dark acrylic pain. This paint really works well on any surface.
After the chalkboard paint is fully dry, remember to prime and condition the painted surface by lightly covering it with chalk then wiping it off. Then it is ready to use as a writing surface.
I hope I have inspire you with this clip art project. Adults and kids alike will surely love using a painted clipboard. I hope you will add in your to-do list... a visit to Paper Lane and grab some Martha Stewart craft paints, tools and accessories. A good quality
product that will surely glow in your craft box!
Good ideas glow in the dark...let your ideas glow...and paint it out!
Cheers,
Irene
Wednesday, March 27, 2013
Tuesday, March 5, 2013
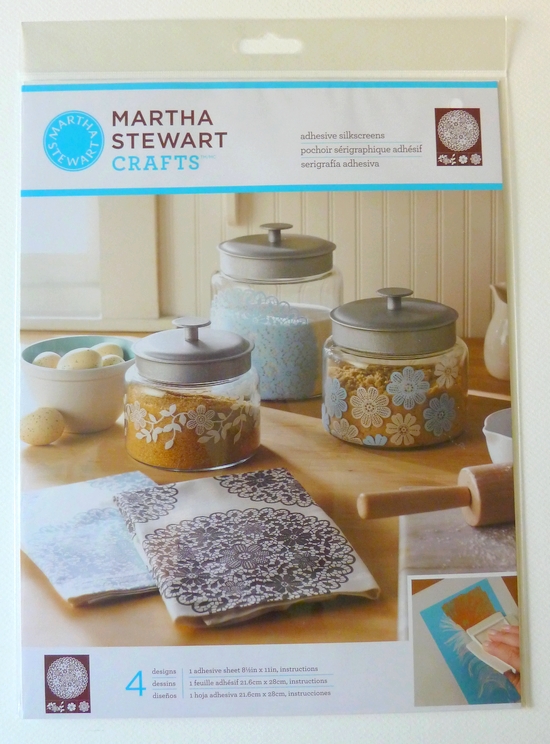
Martha Stewart Glass Paints and Silkcreens
Hello everyone!
It's been really quite awhile since my last post. Health wasn't quite well with me for awhile...depressed for quite sometime...mojo's off...and didn't notice time moves and I was left behind!!! Behind with a lot of responsibilities too.
Anyway, I'm getting back on track and trying to catch up with all that's needs catching up. Energy level is not 100% but at least on the way up I guess and hope it will continue.
Anyway, I would like to inspire you with
projects using Martha Stewart glass paints and adhesive silkscreens. It
looks
like glass painting is a hit lately and I painted a bit myself too! Yes,
time to explore...time to bring something fresh to my crafting space!
The glass paints really works great and
comes in a number of finishes. I used Yellow Gold Metallic, Raspberry
Ice Gloss Opaque, Key Lime Transparent and Feldspar Fine
Glitter glass paints for
these projects. Love the fun paint colors!
The paint comes with
fine point applicator tip and in a nice size bottles which is perfect enough for my craft space. Of course
there are a wide of variety of colors available at Paper Lane
along with Martha Stewart paints accessories such as tools and applicators
which are brilliantly and beautifully designed, stencils and silkscreen,
mediums, finishes and specialty effects. Have to grab some for myself too!
Also, I used the Martha Stewart Floral Doily adhesive silkscreen along on these projects and I just
love how my projects turn out.
I used Raspberry
Ice Gloss Opaque, Key Lime Transparent glass paints on the
vase. Really love these paints!
It has a creamy, smooth texture and really good consistency. There is almost no
odor, too.
The silkscreen is wonderful too! It gives
my project an exquisite detailed design. I find the adhesive backing makes it
simple and easy to apply the paints on the curved surface of the vase.
I used the Foam Pouncer Method for these
projects which I found quite easy for me to use and just ideal for curved
surfaces.
And here’s another glass project:
I used Yellow
Gold Metallic glass paint for these drinking glasses.
Now, I have beautiful and unique hand
painted drinking glasses to grace my table and to offer to my guests.
There are two
methods for curing the Martha Stewart Glass Paints:
Oven-cure and Air
dry method. I used the air dry method (as I live in a sharing accommodation and
shares oven with other staff). My project has now been air dried for 21 days.
As I don’t have a dishwasher either, I hand washed my vase and glasses and WOW
the paint did really stays on the glass!!!
Just in case, here’s the oven-curing directions I
found on the internet are as follows:
After drying for 1 hour, place in cool oven. Set
temp to 350 degrees F and bake for 30 min. (Glass must heat gradually) After 30
min turn the oven off. Let glass cool completely in oven. Don’t use for 72
hours.
I got carried away and I thought I’d play a bit more with these
paints. I'm using these plain glass tea light candle holders for quite awhile now. So, I
give them a lift up. It is new year after all, time for a new look!
Used again the Yellow Gold Metallic glass paint but this time I top it up
with Feldspar Fine Glitter. I love
the sparkle and how they complement each other. It’s awesome that the glitter is light enough
to let me layer the paints for a really customizable look! Just remember not to
oven-cure projects with fine glitter finish; air-cure only.
We are so lucky that Paper Lane has
brought these here in Dubai and stocks the entire selection of Martha Stewart craft paints and
wide varieties of tools and accessories.
I hope you will find time to visit Paper Lane and grab some Martha Stewart craft paints, tools and accessories. This is really a good quality
product and fun tool that you should have in your craft box!
2013…
new you…
explore…
believe in yourself
and let creativity flows.
With these candle lights, I wish that the
lights of the 2013 will bring everlasting joy, colors and merriment to your {painting and crafting}lives.
Love,
Irene
Tuesday, December 11, 2012
My Mind's Eye Christmas Design Inspirations
Hi
everyone! I hope you are all well and starting to get into the festive
spirit as well as crafting spirit. After all, this is the season of joy,
peace, hope
and love. Time when all is bright, like the Christmas projects that I’m
delighted to share using My Mind’s Eye All is Bright paper
collection. I created a couple of cards and Christmas gift baskets.
My first card is a Christmas Box Card.
I
learned how make the basic foundation of this card from a craft fair
that I have attended recently. It was a portrait or vertical style of
card that was taught. I'm just excited to make my own version in
landscape or horizontal style. So happy with the paper collection and
how the card turned out.More excited to share it with you.
I had as much fun decorating the box inside the card and this is how it looks inside. The beauty of this card does not only shows from outside but also from inside. For those who do not celebrate Christmas, the theme of this card can easily be changed for any occasions.
My second card is quite simple, quick and easy to make.
Created a tent-fold style card. After layering the front with cardstock, pattern papers, trims and die cut swirls, I used layered stickers dimensional from the same MME All is Bright collection. Finished it off with some adhesive pearls at the corners.
The
basket have enough space to hold your gifts...either sweets &
treats, crafting goodies or anything you have in mind. It can also be
use to decorate your tables and just fill it up with holiday cheers! The basket theme can also be easily changed for any occasions.
Here is a tutorial for the Christmas gift basket.
2. Using pattern paper of your choice cut panels and adhere the panels to the basket shape as shown. My panels measures as follows: 2 ¼ inches square for corner panels, 2 ¼ x 3 ¼ inches for center-side panels and 3 ¼ x 3 ¼ inches for the center panel or bottom of the basket. Distress score/cut lines and edges as desired.
4. Cut a strip of cardstock to 2 ½ x 11 inches and punch both edges. Top with a strip of 1 x 11 inches pattern paper and adhere to the basket to act as a handle.
5. Decorate basket as desired.
My first card is a Christmas Box Card.
JOY
This
is the side view of the card. I have decorated the spine with ruffled
lace which I have misted with Bronze Tattered Angels Glimmer mist and a
strip of red velvet ribbon. Embellished the front side with cut out
design and sentiment from the same paper collection.
I had as much fun decorating the box inside the card and this is how it looks inside. The beauty of this card does not only shows from outside but also from inside. For those who do not celebrate Christmas, the theme of this card can easily be changed for any occasions.
My second card is quite simple, quick and easy to make.
Merry Christmas
Created a tent-fold style card. After layering the front with cardstock, pattern papers, trims and die cut swirls, I used layered stickers dimensional from the same MME All is Bright collection. Finished it off with some adhesive pearls at the corners.
The last project I made are the Christmas Gift Baskets and this how the baskets look like.
Here is a tutorial for the Christmas gift basket.
Supplies: Cardstock, Pattern Papers,
Trimmer/scissors,border punch, adhesives, embellishments of your choice; Optional: Distress
ink, manual die-cutting machine & dies.
1. Cut cardstock to 8 ½
inches square and score at 2 ½ inches on all sides. Cut as indicated using the template below as guide.
2. Using pattern paper of your choice cut panels and adhere the panels to the basket shape as shown. My panels measures as follows: 2 ¼ inches square for corner panels, 2 ¼ x 3 ¼ inches for center-side panels and 3 ¼ x 3 ¼ inches for the center panel or bottom of the basket. Distress score/cut lines and edges as desired.
3. Assemble the basket. (Opps..I took the photo before I have attached the pattern papers)
4. Cut a strip of cardstock to 2 ½ x 11 inches and punch both edges. Top with a strip of 1 x 11 inches pattern paper and adhere to the basket to act as a handle.
5. Decorate basket as desired.
I hope I have inspired you all today.
Drop by at Paper Lane...grab the All is Bright paper collection from My Mind's Eye. You'll also be amazed by all the goodies available in the store. Also check out the design inspirations from my fellow DT.
Wish you all a Merry and Bright Christmas.
Until next time, happy crafting!
Cheers,
Irene
Thursday, November 22, 2012
Design Inspiration - [Echo Park] For the Record 2
Hello everyone!
For the record, I’m back with another project
to inspire you.
[Echo Park]
FOR
THE RECORD 2 Collection
this beautiful paper collection is so
inspiring.
simply irresistible…simply fabulous...
Reminds me of some cherish photos
that is just perfect for this paper
collection…love it!
Hmmm…
I also have a thing with circles these
days
so I decided to make my layout a circle
scallop.
Simply ME
Hand cut a blue cardstock into circle
scallop.
And who says corner dies are only meant for
square corners?
In this layout, I used Cheerylynn Design Lace
Corner Deco F die
and the yellow pattern paper from the same
collection
as border around my circle scallop layout to
give it a unique look.
Used double sided
foam adhesive t
o add dimension on the center circle in the layout.
The flowers were made using Sizzix Tattered
Floral die. I simply love making them…
Die-cut some leaves and flourishes,
then arrange/glued them at the bottom of the
photo
above a border punch strip of pattern
papers.
Added pearls here and there…
place a title on a tag and the rest of bits
& pieces.
Simply fabulous...my page is done.
Product/technique tip:
Look at your dies and try to use it in a
different way just like I did
and match it with Echo Park Papers ‘For the
Record 2’.
It surely will add some stylish flair and
interest to your page.
Experiment and enjoy!
Supplies:
Paper:
Echo
Park
- For the Record 2
Cardstock:
Bazzill
- Blue;
Embellishments:
Kaisercraft
- adhesive pearls and pearl brads;
American
Crafts - mini pearl brad;
October
Afternoon - mini market stickers
Tools:
CheeryLynn
Design - Lace Corner Deco F/Olive branches/Fanciful Flourish;
Sizzix –
Sizzlits Strip Vintage Market/ Bigz Dies Tattered Florals;
Martha
Stewart – arch lattice punch
And
yet another inspiration for you…
This
is one of MY FAVORITE
TIME WITH
dear friends, family, loved ones and of course YOU.
Kept this card fairly Clean And Simple.
You will be able to make one in no time.
I covered the card base with paper from the
collection
then added ribbon, trims, Prima flower and
leaves.
Added my favorite sentiment which is also from
For the Record 2 Journaling Card.
Hope I got you inspired.
Just for the record…
time for you to scrap those photos and cherish
precious memories
or made a card for your dear friends, family
and loved ones.
check out the latest design inspirations from
my fellow DT members.
Happy crafting everyone.
Hugs,
irene
Sunday, October 21, 2012
I {heart} Washi
Hello crafters!
It’s time
to un-roll those washi tapes.
and grab one for yourself.
Here are some
inspirations for you from the
Indie Chic collections…
Love this collection, it really has chic designs.
Chic tag
Recycled the packaging and made a tag.
I used washi tape as a background
and made a flower out of it.
I decorated/altered
an empty bottle.
I called
this my ‘Washi-tainer’
Made some tiny banners on pins!
Then use as embellishment on a project.
I {heart}
Washi…chic
so versatile…possibilities are endless…
easy to take anywhere.
I hope I have inspired you today.
I wonder
what you’ll come up with.
Visit Paper Lane's beautiful store and grab some washi tapes.
Do check out Paper Lane's Blog
and projects from my
fellow DT members.
Like Paper
Lane at Facebook too!
Most important is for you to enjoy and have fun!
Cheers,
irene
Subscribe to:
Posts (Atom)